Unicorn vs Breaker Block: What's the Difference?
A breaker block is a failed order block: the last up-closed or down-closed candles before price swept liquidity, which price then broke through in the other direction. A Unicorn is a breaker block with a fair value gap aligned inside it. Every Unicorn contains a breaker, but most breakers never become Unicorns, and that overlap is the whole difference.
This guide explains each piece, shows how a breaker turns into a Unicorn, compares where the entries sit, and covers when to skip the trade.
The short answer
| Breaker block | Unicorn | |
|---|---|---|
| Pieces | Liquidity sweep + the breaker candle(s) + a break back through them | Everything a breaker has + a fair value gap that overlaps the breaker |
| Entry zone | The breaker range on the retest | The overlap between the breaker and the fair value gap |
| Stop | Beyond the breaker, or beyond the high/low that swept liquidity | The same two options: beyond the breaker by default, beyond the sweep for more room |
| How often it appears | More often: any sweep followed by a break can leave one | Less often: it needs a breaker and displacement strong enough to leave an aligned gap |
| What invalidates it | Price closing back through the breaker | Price closing back through the breaker. If the gap doesn't overlap or is old, or the breaker had no sweep, it was never a Unicorn |
In short: the breaker tells you where price should be supported. The fair value gap inside it shows that price left that area with force. When both sit in the same place, you have a Unicorn.
What is a breaker block?
A breaker block always starts with liquidity being taken. We don't look for breakers randomly. First we identify which high or low was swept, then we locate the candle, or group of candles, that created the move into that liquidity.
If a structure has several highs or lows and price takes liquidity from more than one leg, use the more significant leg to mark the breaker.
Bullish breaker
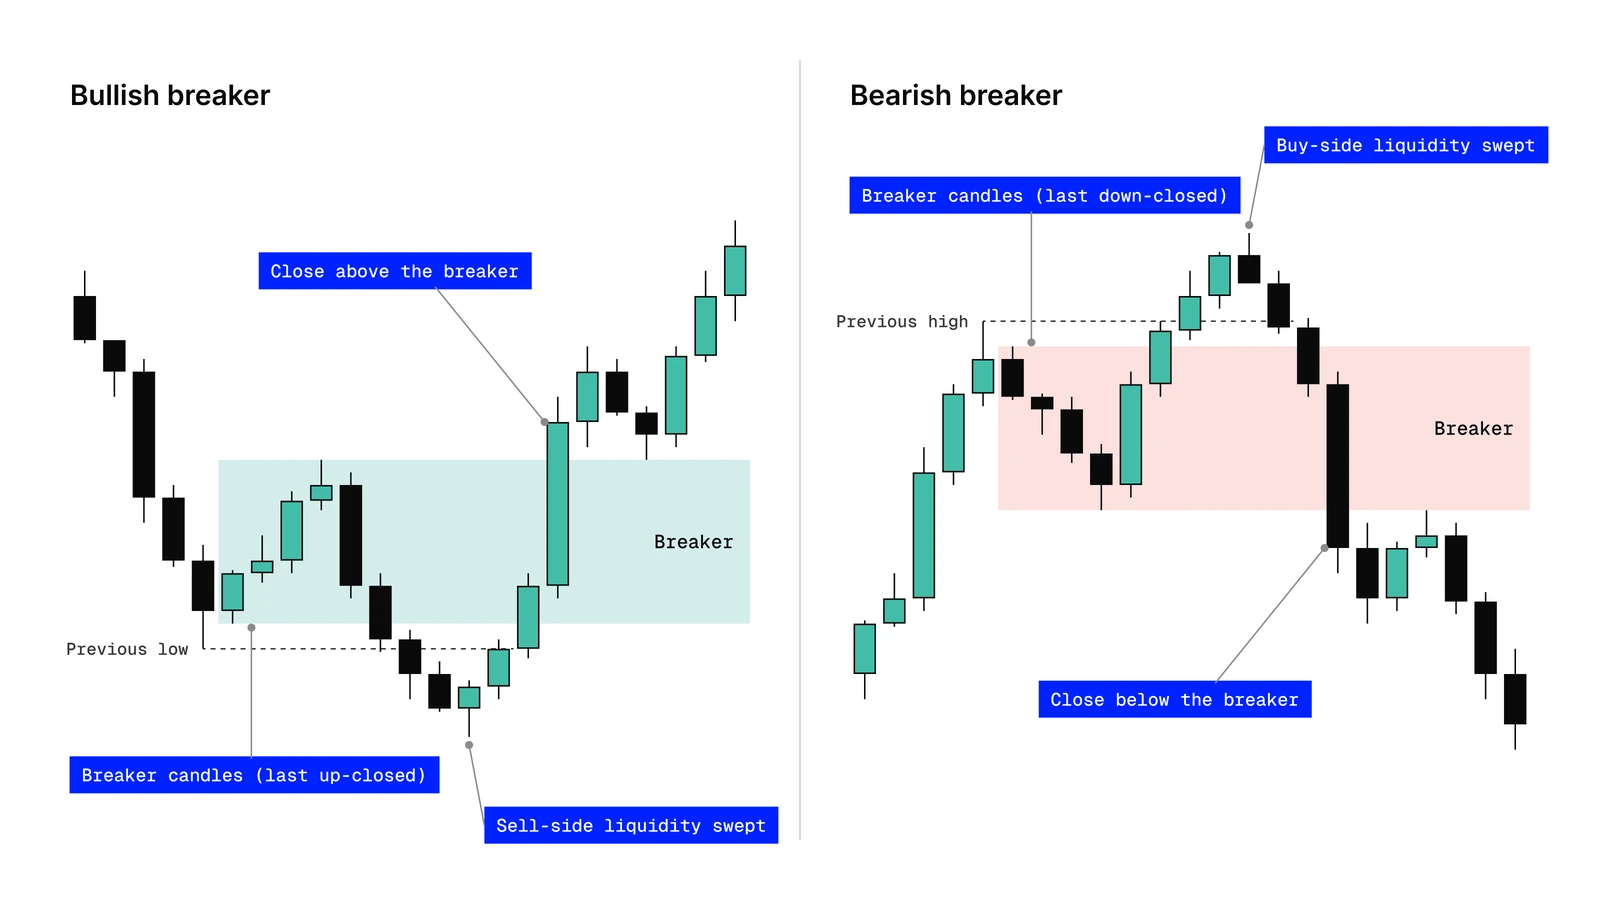
A bullish breaker forms when price takes sell-side liquidity and then moves higher.
- Price moves lower and takes a previous low (a lower low).
- Sell-side liquidity is taken.
- Price reverses and closes above the highest up-closed candle before the move that took that liquidity (a higher high).
- That up-closed candle, or the group of consecutive up-closed candles, is the bullish breaker.
- On the retest, the breaker becomes a potential long area.
Bearish breaker
A bearish breaker is the mirror image. Price takes buy-side liquidity above a previous high, then reverses and closes below the lowest down-closed candle (or consecutive down-closed candles) before the move that took that liquidity. On the retest, that zone becomes a potential short area.
Breaker vs mitigation block
Both are failed order blocks, and both look similar on a chart. The difference is the sweep.
- Breaker block: price takes the previous high or low before reversing. Liquidity was taken, then the order block failed.
- Mitigation block: price fails to take the previous high or low. It makes a lower high (or higher low) and then breaks the structure.
For the Unicorn Model we only use breakers. The sweep is what tells us which side of the market was just cleared, and that is the reason we expect the move that follows. No sweep, no breaker, and no Unicorn.
Where the fair value gap comes in
A fair value gap (FVG) is a three-candle imbalance: a fast candle whose body leaves a gap between the wick of the candle before it and the wick of the candle after it. It forms when price moves so aggressively that one side of the market barely trades in that range.
That aggression is the point. When price displaces through a breaker and leaves a fair value gap on the way, it shows intent. When price grinds back through the breaker with overlapping candles and no gap, the breaker is weaker.
You don't need a full lesson on FVG types here. For the Unicorn, only one question matters: does the gap overlap the breaker?
How a breaker becomes a Unicorn
The full sequence always runs in the same order:
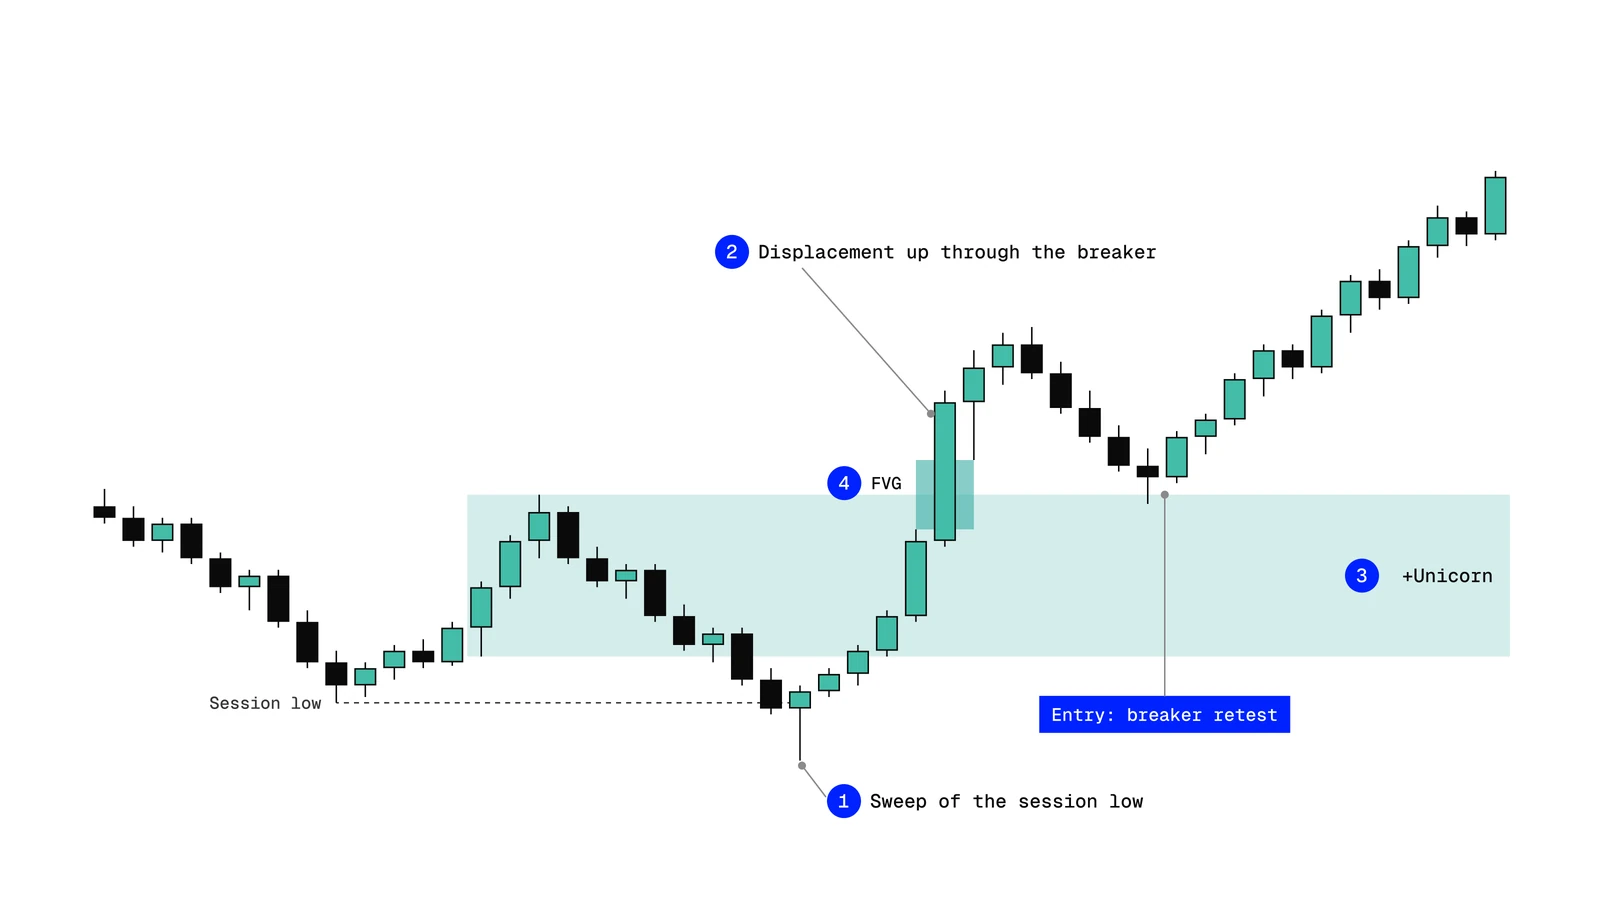
- Sweep. Price takes a previous high or low.
- Shift. Price reverses and closes back through the breaker candle(s). That close is the change in direction.
- Breaker. The up-closed candle(s) (bullish) or down-closed candle(s) (bearish) that started the move into the swept level are now the breaker zone.
- FVG that overlaps. The displacement through the breaker leaves a fair value gap whose range overlaps the breaker range.
If step 4 is missing, you still have a breaker. It may still be tradable, but you are relying on the breaker alone to hold price, and you shouldn't call it a Unicorn.
A Unicorn is only confirmed once a candle closes, on the same timeframe, above the Unicorn level in a bullish setup or below it in a bearish one. Our guide on confirming a Unicorn before entry covers that confirmation in detail.
The Unicorn is an entry pattern. The Unicorn Model builds a full process around it.
Breaker, FVG or Unicorn entry: which one to use?
The three options differ in where you place the order and what you are trusting to hold price.
Entering on the breaker alone
You wait for price to retest the breaker range after the close back through it. This is a valid trade, and it shows up more often than a Unicorn. But nothing besides the breaker supports the idea, and without displacement it is often a weaker setup. If you trade it, call it what it is: a breaker trade, not a Unicorn.
Entering on the FVG alone
You enter on the touch of the gap, at its 50% level (consequent encroachment) or at its full fill. A fair value gap on its own can work, but gaps appear constantly. Without a sweep and a breaker underneath it, you don't know which liquidity was taken or why price should respect that gap rather than the next one.
Entering on the overlap
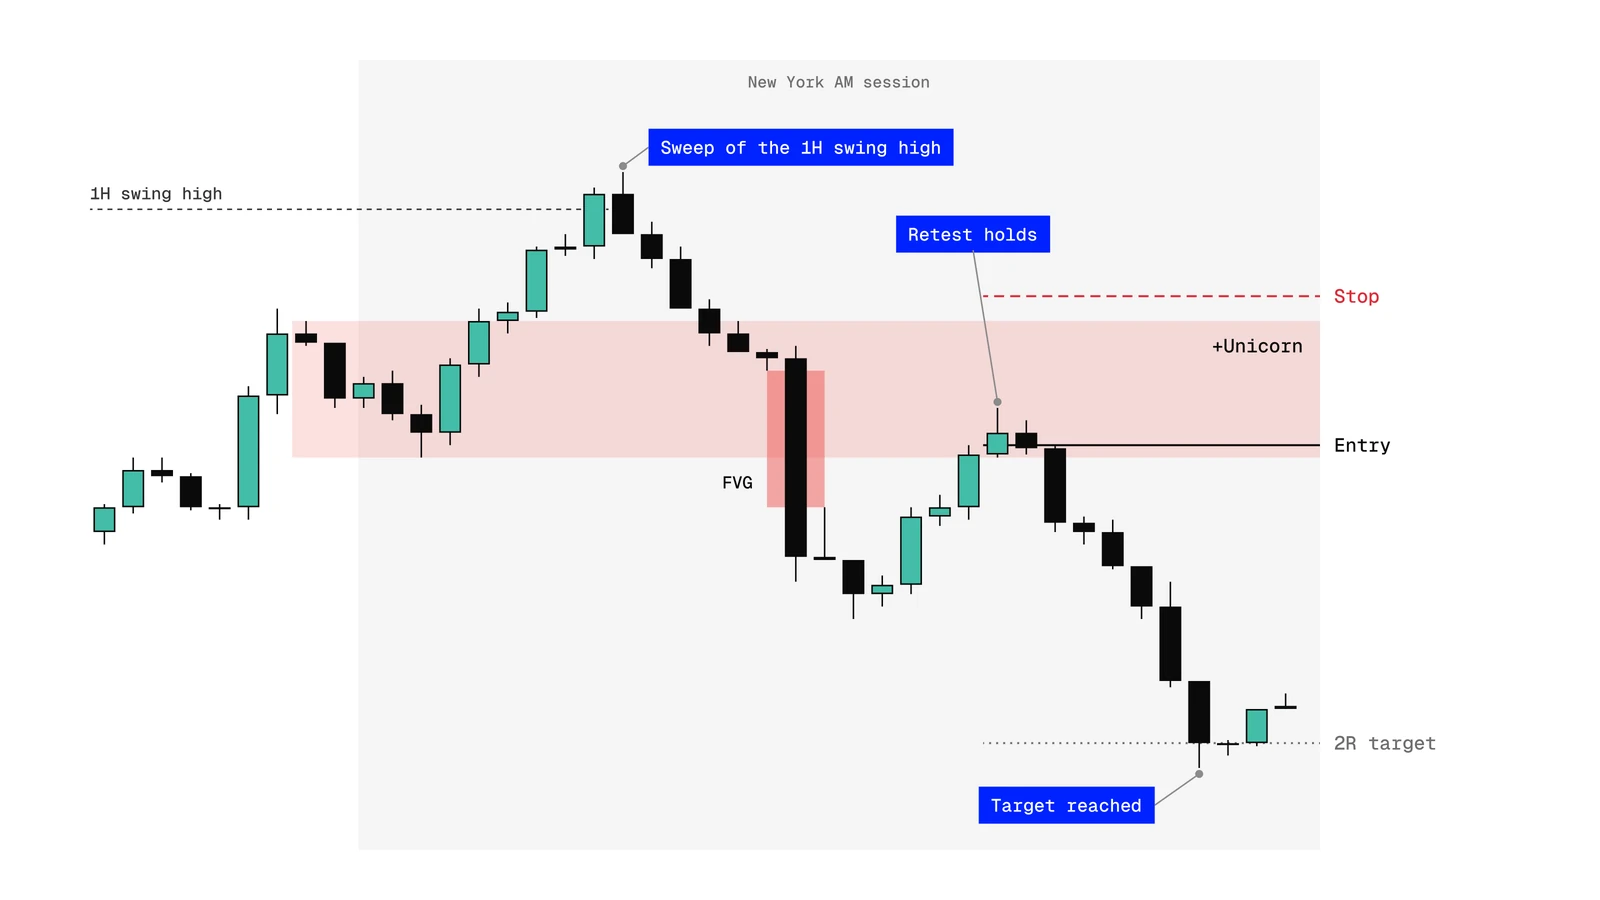
This is the Unicorn entry. After a candle confirms the setup, the usual order is a limit order on the retest of the breaker, or a market order when price is already close to it. The stop goes beyond the breaker by default, or beyond the high/low that swept liquidity when you want room for a wick. Both options are compared in how to set your Unicorn entry and stop loss.
Common mistakes
Most "Unicorns that didn't work" weren't Unicorns in the first place. Check for these before you place an order.
- A nearby FVG that doesn't overlap. A gap a few ticks above or below the breaker is not aligned. If the two ranges don't share price, it's a breaker plus a separate gap, not a Unicorn.
- An old FVG. The gap has to come from the displacement through the breaker. Pairing a fresh breaker with a gap left hours earlier mixes two different moves.
- A breaker without a sweep. If no high or low was taken first, you are looking at a mitigation block or just a broken candle. The sweep comes first, always.
- No confirmation close. Entering while the candle that breaks the breaker is still open means trading something that may never confirm.
- Ignoring context. A perfect-looking Unicorn can still form against the higher-timeframe direction, outside the session windows, or with no room to a target. The pattern is identical, but the trade isn't. We cover this in The Unicorn Is a Pattern, Not a Model.
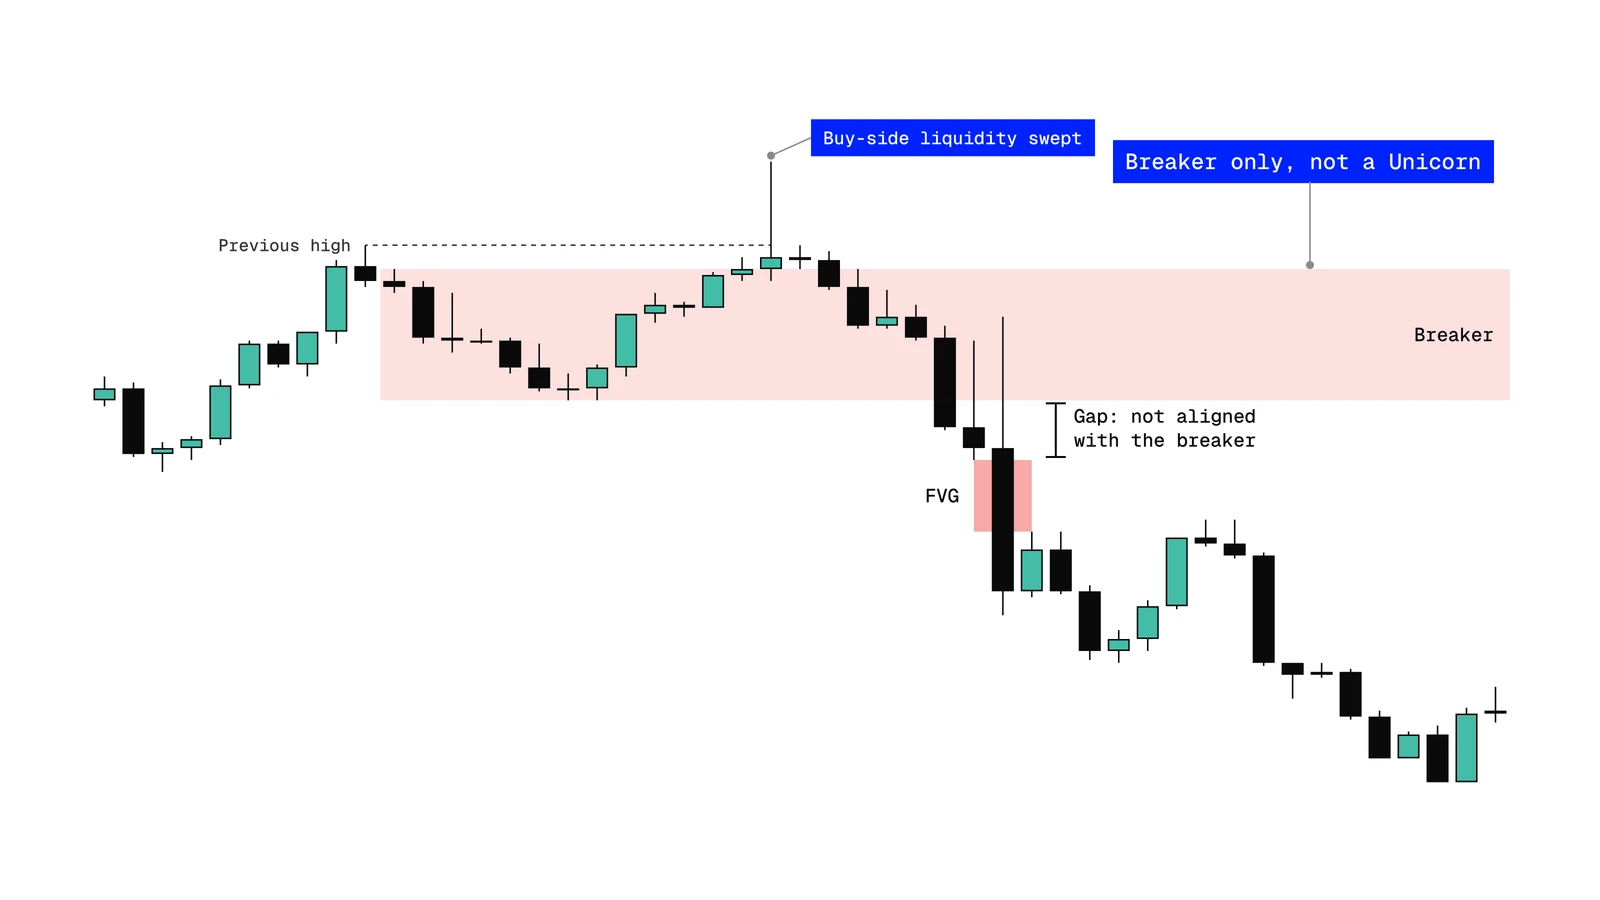
Chart examples
Below are annotated examples with every piece marked, including one that lost. We show losers on purpose: the same structure can still fail, which is why the stop exists and why context matters.
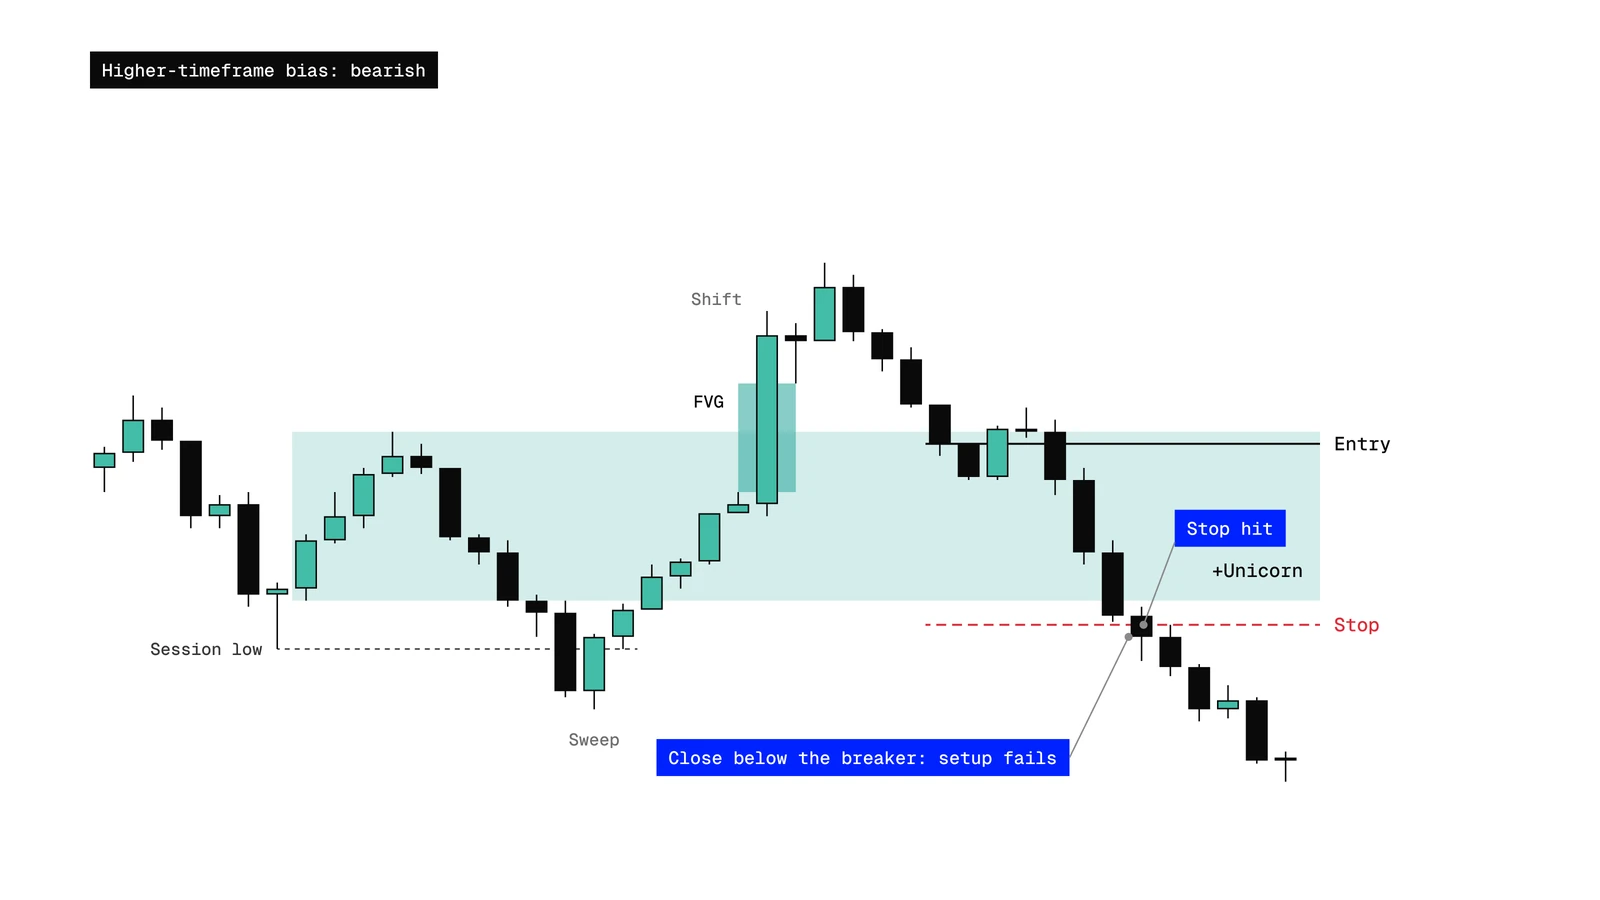
How the indicator marks breakers and Unicorns
This article is published by The Unicorn Model, which sells a TradingView indicator for this setup.
Our indicator draws this sequence on the chart as it develops. With Breaker + Unicorn Mode on, it first shows the breaker as it forms. If a valid fair value gap confirms, it switches that zone from a breaker to a Unicorn. You see the sweep, breaker, FVG and Unicorn sequence instead of only the final result. It can also show the 50% level of the breaker or Unicorn range and the consequent encroachment of the FVG.
The indicator marks structure. It doesn't decide whether the trade fits your context, and it isn't a signal service. See what changed in the latest indicator update, or the full Unicorn Model course for the complete method.
FAQ
Is every breaker block a Unicorn?
No. A breaker becomes a Unicorn only when a fair value gap from the displacement overlaps the breaker range. Without that overlap, it's just a breaker. You can still trade it, but on the breaker alone.
What is the difference between a breaker block and an FVG?
A breaker block is a zone of candles (the failed order block that started the move into the swept level). A fair value gap is a three-candle imbalance left by a fast move. The breaker shows where price should be supported, and the FVG shows that price left with force. The Unicorn is the spot where both overlap.
Where is the entry on a breaker block plus FVG?
After a candle closes beyond the Unicorn level on the same timeframe, place a limit order for the retest. Use a limit order on the breaker retest, or a market order when price is already close to it. The stop goes beyond the breaker by default, or beyond the high/low that swept liquidity for more room.
Is a breaker block the same as a mitigation block?
No. Both are failed order blocks, but a breaker forms after price sweeps a previous high or low, and a mitigation block forms when price fails to reach it. The Unicorn Model uses breakers only, because the sweep is part of the reason for the trade.
Start with the full picture
The Unicorn is an entry pattern. The context around it decides whether it's worth taking. Start with the full Unicorn Model course to see how the pieces fit together, or see the indicator plans to have breakers and Unicorns marked on your chart.
Trading futures and other leveraged products involves substantial risk of loss and is not suitable for every investor. This article is for educational purposes only and is not financial advice. Past performance does not guarantee future results.