Unicorn Risk Management: Position Size and the 2R Target
Trading futures and other leveraged products involves substantial risk of loss and is not suitable for every investor. This article is for educational purposes only and is not financial advice. Past performance does not guarantee future results.
Risk management in the Unicorn Model comes down to three fixed rules: size every trade from the distance to the stop, take profit at a fixed 2R by default, and leave the stop where it is until the trade is either stopped out or reaches the target. Everything else, from skipping trades without room to the target to planning for losing streaks, follows from those three. This article walks through the math behind each one, with clearly labelled example numbers rather than results.
Risk starts at the stop
Every number in this article depends on one level: the stop. In the Unicorn Model the stop goes beyond the breaker by default, because the breaker failing is what invalidates the idea, or beyond the high/low that swept liquidity when you want room for a wick. Both methods, and the entry rule that goes with them (a limit order on the breaker retest, or a market order when price is already close to it), are covered in how to set your Unicorn entry and stop loss.
Once the stop is placed, it defines your risk. The rest of this article works from there.
Position sizing from the stop
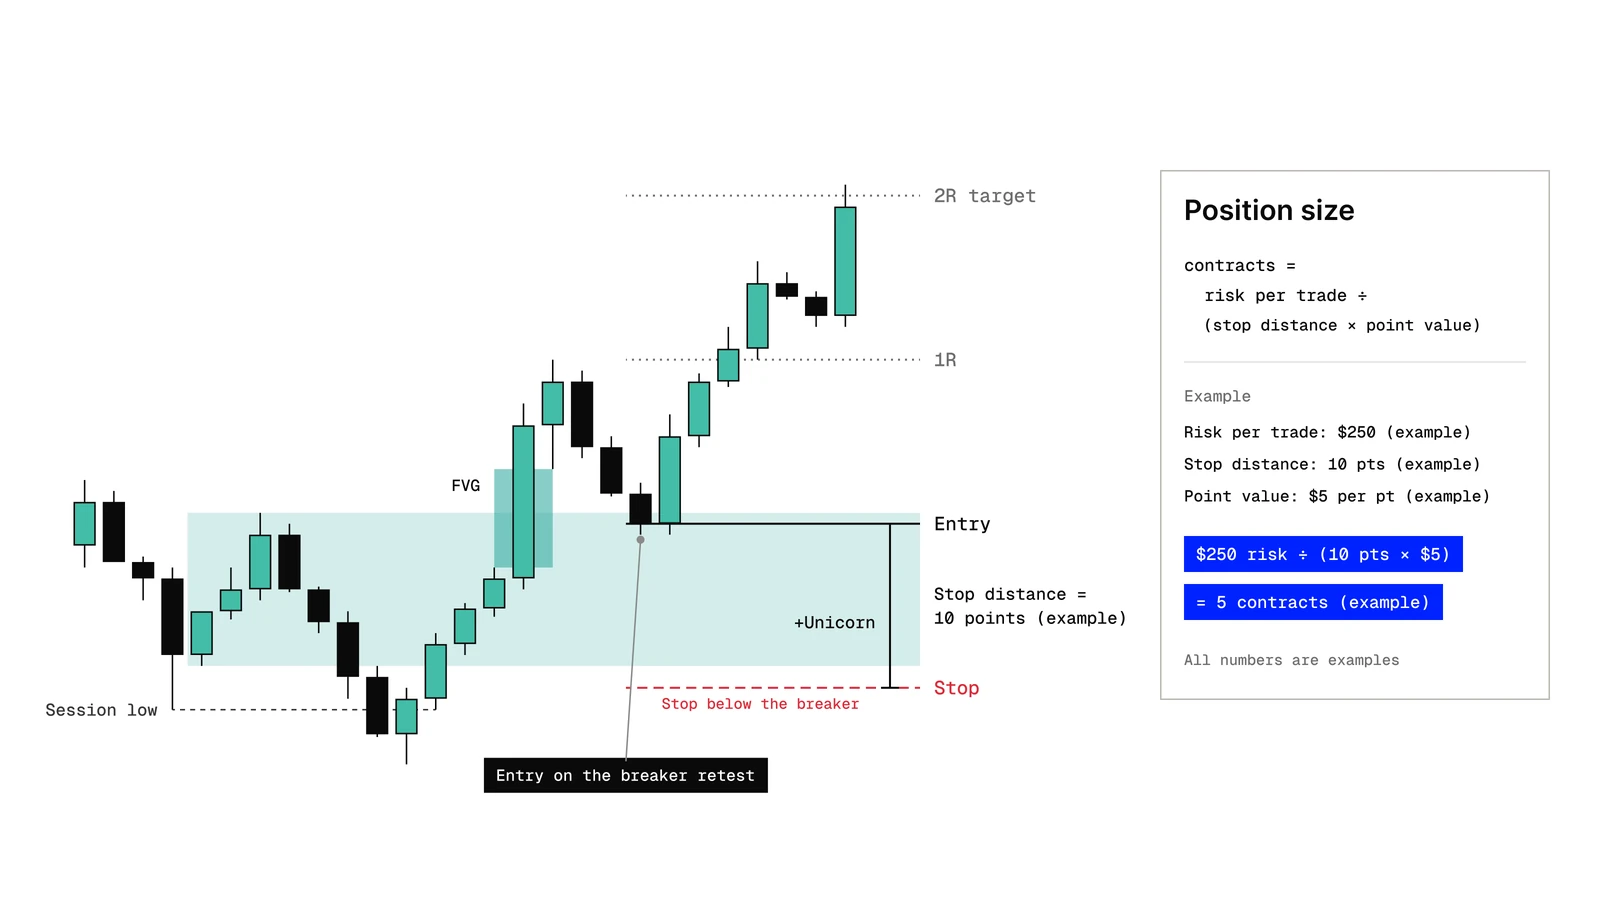
Position size is the output of the stop, not the input. You don't pick a number of contracts and then find a stop that fits. You decide how much of your account you're willing to lose on this trade, measure the distance to the stop, and let the math give you the size.
Our rule is simple: we risk 0.5% of the account per trade. Every trade, the same percentage.
The formula for futures:
Contracts = (Account size × Risk %) ÷ (Stop distance in points × Value per point)
Always round down to a whole contract. Rounding up means risking more than you planned.
Worked example (the dollar amounts and point values are illustrative only):
- Example account: $50,000
- Risk per trade: 0.5% (our rule) → $250 on the example account
- Example stop distance: 10 points from entry to the stop beyond the breaker
- Example contract value: $5 per point
Risk per contract = 10 points × $5 = $50. Contracts = $250 ÷ $50 = 5 contracts.
Now suppose the next Unicorn forms with a 20-point stop. Same example account, same 0.5% risk: $250 ÷ (20 × $5) = 2.5, rounded down to 2 contracts. The dollar risk stays roughly the same; the size changes. That's the point: a wider stop means a smaller position, not a bigger loss.
Point and tick values differ between index futures contracts, and between full-size and micro contracts. Check yours with our futures tick value calculator before you size anything.
Thinking in R
R is the amount you risk on a trade: the distance from entry to stop, expressed as one unit. If price hits the stop, the trade is −1R. If it reaches a target twice as far as the stop, it's +2R.
Thinking in R instead of dollars or points does three things:
- It makes trades comparable. A 10-point stop and a 25-point stop are both 1R. A different stop size doesn't make one trade "bigger" than the other.
- It separates the method from the account. The same sequence of trades in R looks the same on a small account and a large one. Only the dollar value of 1R changes.
- It takes the emotion out of a single trade. A loss is −1R, as planned. Nothing more, nothing less.
Why we take profit at 2R
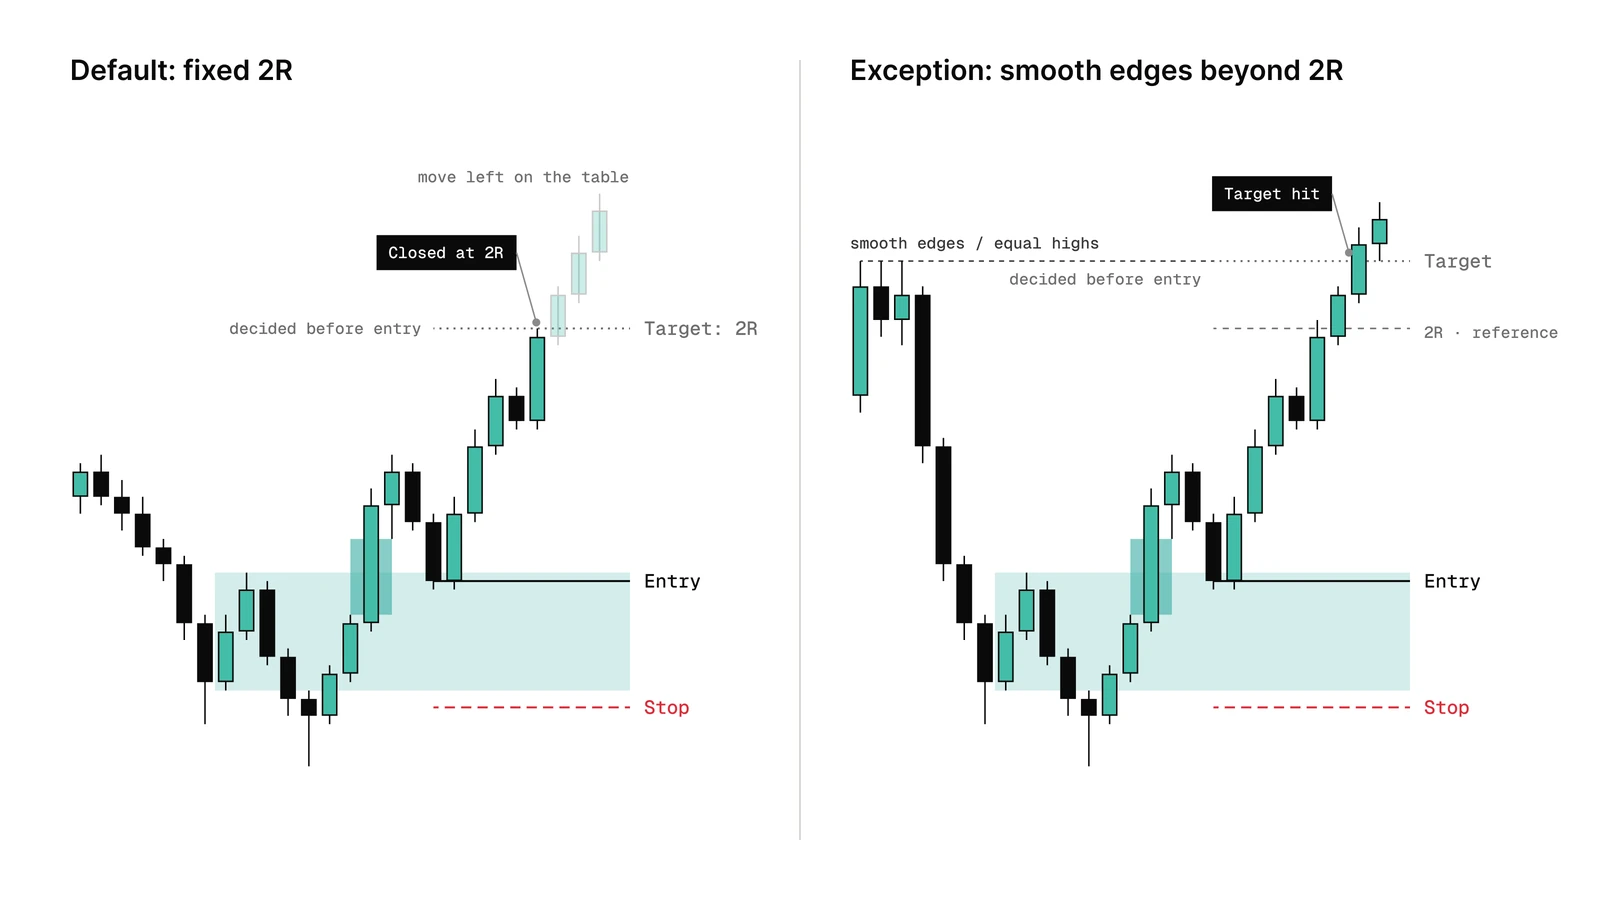
The general rule for every trade in the Unicorn Model is a fixed 2R take profit: the target sits twice the stop distance away from the entry. With a 10-point stop, the target is 20 points from the entry. That's the default, and on most trades it's the only target.
This is a rule of the method, not a promise of results. Here's what it gives you, what it costs, and the one case where we let a trade aim further.
What a fixed target gives you
- Consistency. Every default trade has the same reward-to-risk. You don't renegotiate the target in the middle of the trade.
- Something you can test. Because the exit never changes, you can review your own trades and know that the result depends on the setup, not on how you felt about the exit that day.
- No improvising. The target is decided before the order is placed. There's nothing left to decide once you're in, which removes one of the most common ways traders sabotage good entries: closing early out of fear, or holding too long out of hope.
What it costs you vs liquidity targets
The honest trade-off: price sometimes runs well past 2R, toward the next obvious pool of liquidity, and a fixed target leaves that move on the table. Traders who always aim at liquidity targets (an old high, the other side of the range) will sometimes catch much bigger moves than 2R.
The cost of that approach is that the target changes from trade to trade, the reward-to-risk is different every time, and the exit becomes a judgment call. Some trades pass 2R and then reverse before reaching a distant target. The fixed 2R accepts missing some large moves in exchange for a rule you can apply the same way every time.
When we let the trade aim beyond 2R
There is one exception, and it's defined before the entry, not during the trade: a clear smooth edges or equal highs/lows level in the direction of the trade, beyond 2R.
Smooth edges are a run of highs (or lows) that line up along one horizontal level without breaking it: price keeps stopping at the same place. They often form during consolidation, for example in the Asia range, and they're easy to spot at a glance. If you have to search for them, they're probably not there. Many traders read that clean line as safe support or resistance and park their stops just beyond it, which is exactly why it attracts price. Equal highs or lows work the same way.
When a level like that sits beyond 2R in the trade's direction, the target goes at that level instead of at 2R. When there's no clear level, the target stays at 2R. Either way, the exit is decided before the order is placed and never moved once the trade is open.
Liquidity also plays a second role with a fixed target: it decides whether the trade is worth taking at all (see "When to skip a trade" below).
The math
With a 2R target and a 1R loss, the breakeven win rate is one in three:
Win rate × 2R = Loss rate × 1R → Win rate = 1 ÷ 3 ≈ 33.3%
At 2R, a trader who wins one trade in three breaks even before commissions and slippage. The same arithmetic applies to a trade aimed at a smooth edges level further away. With a target at 3R, for example, the breakeven point would be one in four (25%). But the arithmetic says nothing about how often either target is actually reached, and a more distant target is a different bet, not a free upgrade.
These numbers are arithmetic, not statistics about the Unicorn Model and not a promise of any result. Commissions, slippage and missed fills all push the real breakeven point higher. Use our return calculator to see how different win rates and R values play out over a number of trades.
When to skip a trade
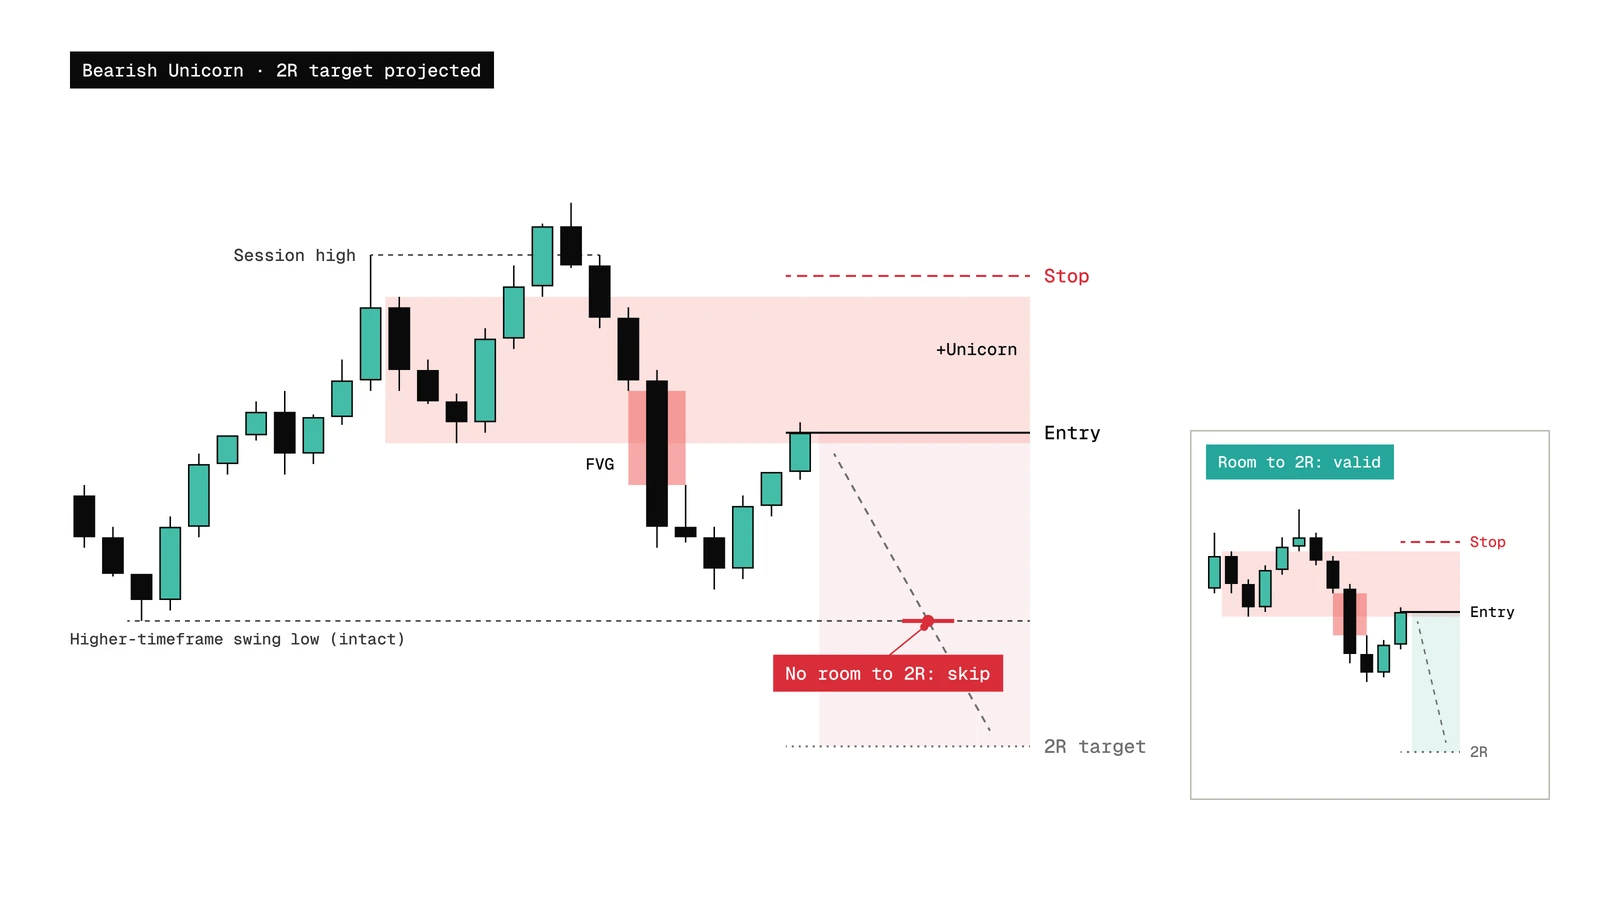
A fixed target only makes sense if price has a clear path to it. Room to the target is one of the filters the Unicorn Model uses before every entry.
Before you place the order, project the 2R level and look at what sits between your entry and that level:
- An untouched higher-timeframe high above a long (or low below a short)
- A fresh higher-timeframe fair value gap in the way
- Equal highs or lows on the opposite side that price hasn't run yet, closer than 2R
If one of these sits between entry and target, the trade has to fight through it to pay out. In that case, skip it. A valid Unicorn with no room is still a trade with a reason to fail. A clear draw on liquidity in your direction, beyond the 2R level, is the opposite: it gives price a reason to travel.
Room to the target is one of several context filters. The others (higher-timeframe direction, time of day and which liquidity was taken) are explained in The Unicorn Is a Pattern, Not a Model, and reading direction from a sweep is covered in Liquidity Sweep vs Liquidity Run.
Why the stop doesn't move to breakeven
Many traders move their stop to the entry price once a trade is in profit. The Unicorn Model doesn't. Once the order is filled, the stop stays where it was placed until the trade either hits the stop or reaches 2R.
The reason comes from what the stop represents. The breaker is what supports price for the move that follows, so the trade is invalidated only when the breaker fails. A retest back to the entry, or a wick into the breaker, is normal price behavior and doesn't invalidate anything. Moving the stop to entry turns those normal retests into exits, and closes trades whose idea is still intact.
It also breaks the math above. The 2R rule and its one-in-three breakeven point assume that every trade ends at either −1R or its planned target: 2R, or the smooth edges level when there is one. Add a breakeven stop and many trades end at 0R instead, some of which would have reached the target. The result is a different system, with a different breakeven win rate, that you haven't actually planned for.
The rule is simple: the stop is set once, from the structure, and left alone.
Losing streaks and drawdown
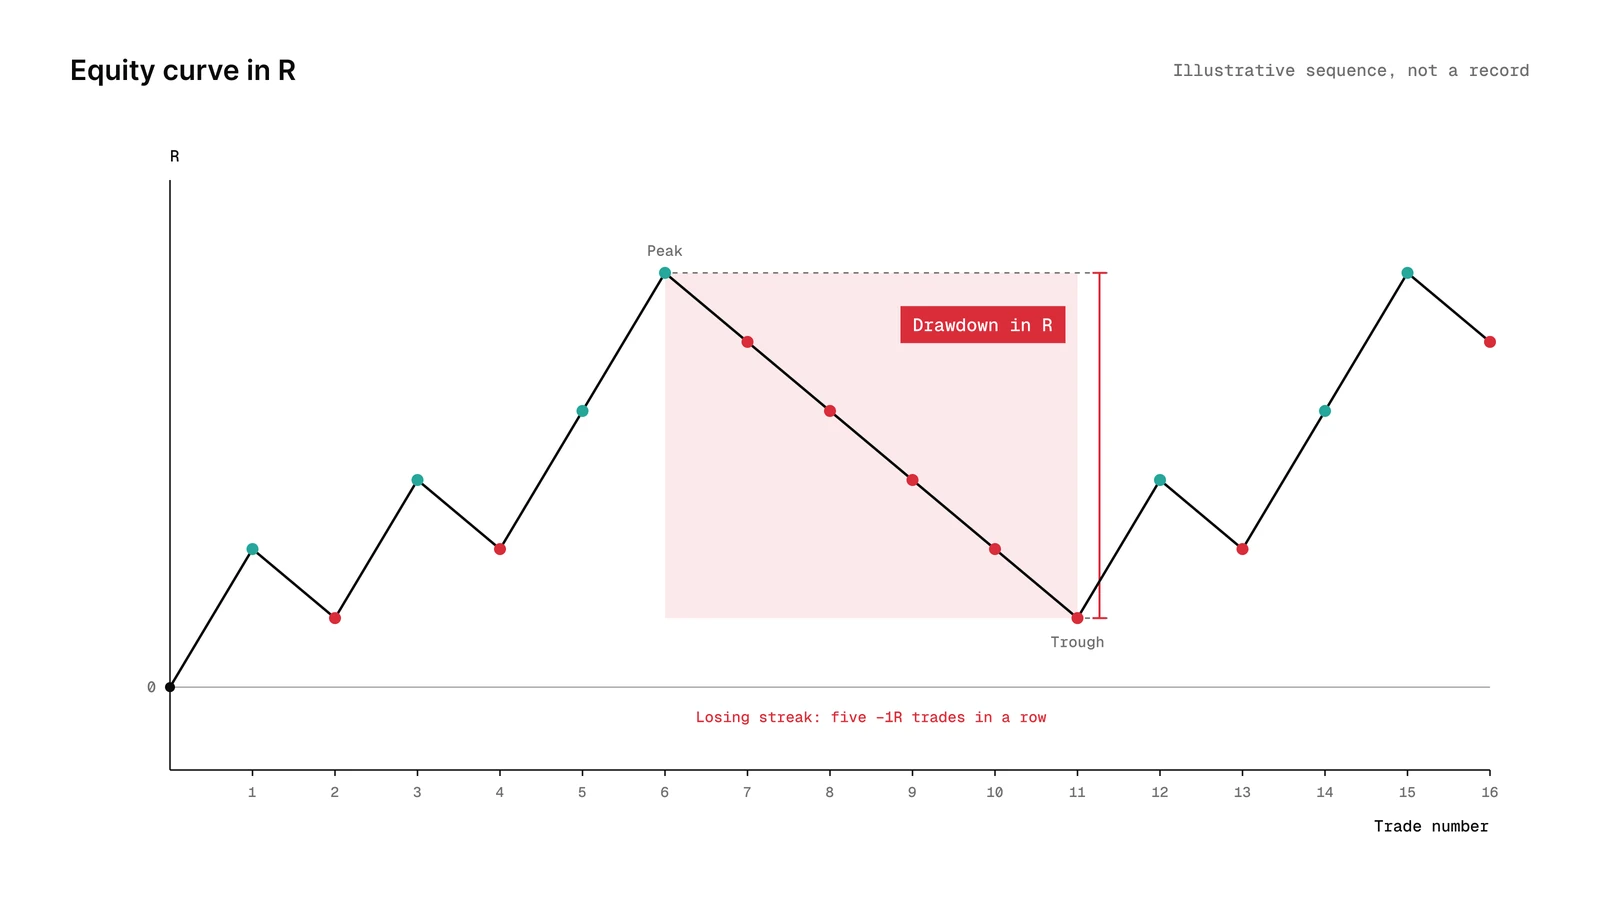
Losses come in clusters. With any method, a run of several losses in a row is normal and should be planned for before it happens, not after.
In R, a losing streak is easy to read: five losses in a row is −5R. What that means for your account depends only on how much 1R is worth.
Illustrative arithmetic (example numbers, not results):
- At 0.5% risk per trade, five consecutive losses cost roughly 2.5% of the account.
- At 2% risk per trade, the same five losses cost roughly 10%.
Same trades, same method, very different drawdown. That's why the risk percentage matters more than any single entry. Because each loss is a percentage of a slightly smaller account, the real figures are a little lower than the simple sum, but the order of magnitude is the point.
Use our drawdown simulator to see how long losing streaks can last at different win rates and risk levels, and how deep the drawdown gets. Size so that a streak you would consider realistic doesn't force you to change the method halfway through it.
Daily and weekly limits
Position sizing controls the loss on one trade. Limits control the loss across many. Decide them in advance, write them down, and stop when one is hit:
- A daily limit. A maximum number of losing trades, or a maximum loss in R, after which you stop trading for the day. It prevents the most expensive mistake in trading: trying to win back a loss immediately.
- A weekly limit. A larger cap that ends the week early if reached, so one bad stretch doesn't become a bad month.
- No limit on not trading. Some days the context never lines up: no sweep at a session open, no room to the target, no Unicorn. No trade is a valid outcome and still counts as following the plan.
The exact numbers depend on your account and, on a funded account, its rules. What matters is that they're set before the session, not during it.
FAQ
How do you calculate position size for futures?
Divide the amount you're willing to risk on the trade by the risk per contract. The amount you risk is your account size × risk %. Risk per contract is the stop distance in points × the contract's value per point. Round down to a whole contract. Check point values with a futures tick value calculator.
What does a 2:1 risk-reward ratio mean?
The target is twice as far from the entry as the stop. You risk 1R to make 2R. At that ratio, the breakeven win rate is about 33.3% before costs. That's arithmetic, not an expected result.
Should you move your stop to breakeven?
The Unicorn Model doesn't. The stop sits beyond the breaker because the breaker failing is what invalidates the trade, and a retest to the entry doesn't. Moving the stop to entry exits trades whose idea is still valid and changes the risk-reward math the 2R rule depends on.
Is a fixed target better than a liquidity target?
Neither is better in every case. A fixed 2R gives you a consistent, testable rule and removes in-trade decisions, at the cost of missing some larger moves. Liquidity targets can catch those moves but change the reward-to-risk on every trade. The Unicorn Model uses 2R as the default and aims further only when a clear smooth edges or equal highs/lows level sits beyond 2R, decided before the entry. Liquidity also decides whether there's room for the trade at all.
Make risk the part you never improvise
This article is published by The Unicorn Model, which sells a TradingView indicator for this setup.
The setup decides where the stop goes. The stop decides the size. The 2R rule, or a clear smooth edges level, decides the exit before you're in. Learn the full process, from liquidity and context to execution and risk, in the full Unicorn Model course, or see the indicator plans to have breakers and Unicorns marked on your chart while you focus on the plan.
Trading futures and other leveraged products involves substantial risk of loss and is not suitable for every investor. This article is for educational purposes only and is not financial advice. Past performance does not guarantee future results.